Wednesday, February 26, 2014

winter beauty favorites

Today we are continuing the seasonal denial as I share my winter beauty favorites. These products have been great to my skin, but I'm ready to move on to bigger, better, springier things!


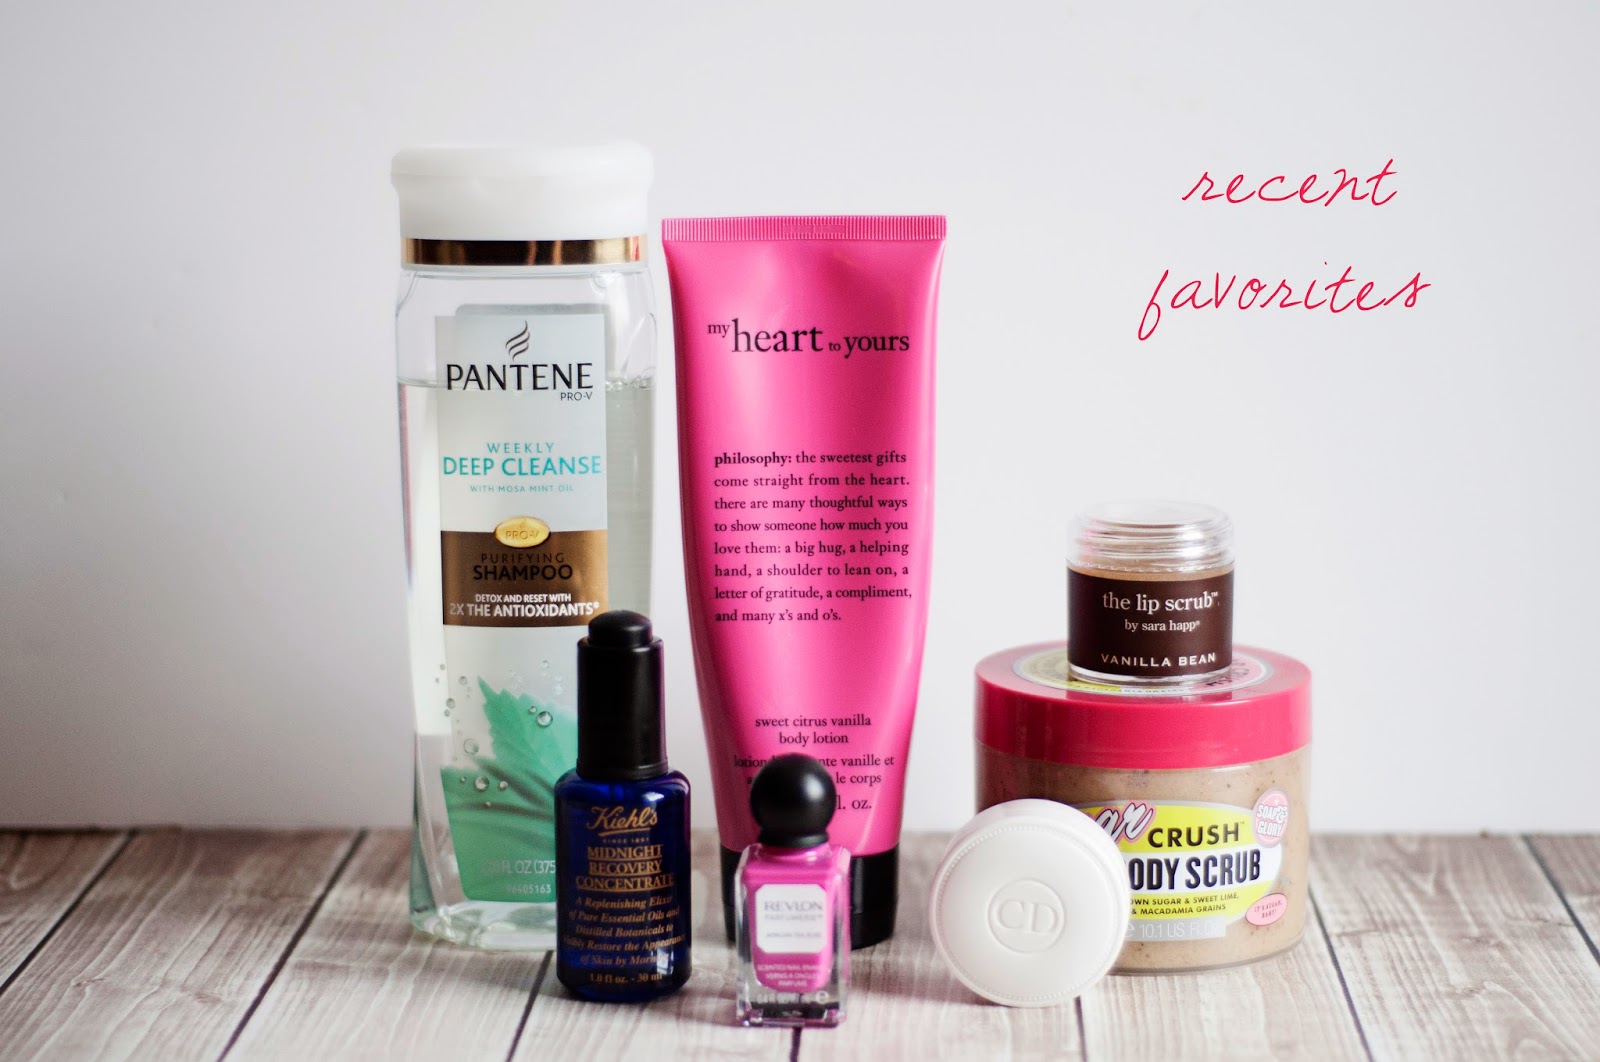
We've got a shampoo, nail polish, lip balm…all sorts of fabulous things! Let's get started!

First up? This body lotion from Philosophy. I've needed extra hydration and this body lotion is perfect! It's smells SO GOOD, and sinks into my skin quickly so I don't feel sticky. I've used lotions from Philosophy for quite a while, and this one is by far my favorite scent. 


To battle dry skin further, I've been using this body scrub 2 to 3 times a week in the shower and following up with the Philosophy body lotion above. I'm a huge fan of Soap & Glory's body scrubs, mainly because of the texture. Their scrubs are never too thin, and always have a good amount of "scrubbers" to balance out their thickness. This one in particular smells exactly like key lime pie, but the rest of their scrubs smell fantastic too. Definitely try one of these if you're looking for a good scrub. 


Raise your hand if your lips are in bad, bad shape…yeah, I see you all raising your hands. Let me suggest this lip balm to you. It's really saved my lips this winter, along with the scrub I will mention below. I discovered this through a subscription service that I no longer subscribe to, but I'm really glad I got this gem before I canceled it. First, the balm smells like roses, which I thought I would hate, but I really don't. Second, it's sooo hydrating. I've been using this sparingly because a full-size of this is $27 (which I think is a little much) so I will only coat my lips before bed. I wake up with perfectly hydrating lips, and they haven't peeled at all!


I also got this lip scrub in a subscription box, and it was a huge sample. I'm not sure I will get through this whole thing. Anyway, this is the lip scrub from Sara Happ in the Vanilla Bean scent, but it really smells and tastes like french toast to me…yum! I've really loved the texture of this scrub. It's thick enough to scoop out and spread evenly on my lips without all the scrub slipping off, but not too thick. I use this first and then follow with the Dior lip balm I mentioned above at night! Your lips will be super smooth when you wake up!


I think I've lived in this nail polish all winter. It's the shade African Tea Rose from Revlon's Parfumerie line of scented nail polish. To be honest, when I first saw the display of scented polishes in Walmart, I was very skeptical and thought they were a little gimmicky, but I saw this particular shade on one of my favorite youtuber's channels and bought it immediately after I discovered it was a drugstore polish. The formula of this polish is really great, stays shiny, and I can usually go almost an entire week before I have to touch it up. Surprisingly, I love the scent, this one smells like rose, but it only lasts for about a day before it wears off. The line has lots of colors, and I've seen really great reviews about all of them! 


So, skincare is something that is really important to me, and I'm willing to save up and buy great products if they are worth it. I did a lot of research before I bought Kiehl's Midnight Recovery Concentrate and it definitely has not disappointed me. I was looking for something to keep my skin hydrated and healthy and this serum does both of those things to perfection. The first night I used this serum I woke up, looked in the mirror and my skin really looked more hydrated and healthy. Plus, it helps to keep my skin comfortable throughout the day too. I haven't experienced any tightness or dry patches, and I've received lots of complements about my "glowing skin". This stuff really works, and a little goes a long way. If you're looking for something to help the texture, hydration, and overall health of your skin I highly recommend this product. 


Last but not least, this clarifying shampoo from Pantene. I use dry shampoo in my hair almost every day and that can cause a good bit of build-up in my hair. I use this shampoo once a week followed by a deep conditioner, and I can tell a noticeable difference in my hair. It leaves my roots super clean, but my lengths and ends remain hydrated and soft. I always have fantastic hair on the days following the use of this product. Plus, it smells refreshingly minty. Yeah!

Now, it's time for new Spring products! Woo! Does anyone have anything they've been eyeing lately for Spring? Share below if you do!

Monday, February 24, 2014

meyer lemon pudding cakes

I'm baaaack! And in my own little world I've decided it's Spring! I've been wearing bright colored pants, opening the windows in the car and in the house, and putting all my winter clothes in the back of my closet. I'm hoping the snowstorm that's coming later this week will take note of my clothing and move right along. 


To kick spring off, today I'm sharing these Meyer Lemon Pudding Cakes. My oh my are these things yummy! They are a light dessert with bright citrus flavor, but they do a magic trick in the oven. The top bakes into the most moist, spongy delicious lemon cake, while the bottom becomes a creamy lemon pudding. Spring! Hurry!


If you're in seasonal denial like I am you're really going to want to try these little cakes, and maybe try a few new Spring things. I've been wearing neon pants, freshening up my makeup drawer, and wearing a sample of a new fragrance! Also, someone told me we only have a few short weeks until the time change…hallelujah for more daylight!


Meyer Lemon Pudding Cakes

makes 6 small ramekins, 3 large ramekins, or 1 8x8 baking dish
Inspired by Simply Scratch

1 cup granulated sugar
1/2 cup flour
1/2 teaspoon salt
4 eggs, separated
1/3 cup of Meyer lemon juice (I used 1 1/2 lemons)
1 tablespoon Meyer lemon zest
1 tablespoon unsalted butter, melted
1-1/2 cups whole milk

Preheat oven to 350 degrees.
In a small bowl mix sugar, flour, and salt with a fork working out any lumps. Set aside
In a large bowl, whisk together egg yolks, butter, and lemon zest. Once combined, whisk in the lemon juice. Alternate between whisking in the flour mixture and milk until a thick creamy batter is reached.
In the bowl of a stand mixer fitted with the whisk attachment, whip egg whites until stiff peeks form. 
Gently fold whipped egg whites into the lemon batter. The mixture will be thick and very foamy.
Pour batter into un-greased, un-floured ramekins or a baking dish. Bake at 350 degrees for 35 - 40 minutes. Remove from the oven and let cool. Dust with powered sugar. Enjoy!


Friday, February 14, 2014

Baked Chocolate Chip Vanilla Bean Donuts with Berry Coulis Topping

Eating these donuts is like eating polka dots and I'm really pumped about that! Polka dots for Valentine's Day - major YES!


These are deliciously moist and tender vanilla bean donuts studded with mini chocolate chips and they are adorable (and also yummy)! Plus, they are topped with a sweet and tart berry topping that will knock your socks off! SO YUM!


Today is both Valentine's Day and my birthday and this day is usually a struggle for me so, I'll let the photos and the following verse do the talking today. Relax, everything's going to be alright; rest, everything's coming together; open your hearts, love is on the way. Jude 1:1-2 (Message Translation)


Chocolate Chip Vanilla Bean Donuts with Berry Coulis Topping

Donuts inspired by Cooking Classy 
Toppers from Christina at Sweet Lavender Bake Shoppe - she is sooo sweet and an absolute dream to work with. 

2 2/3 cups all-purpose flour
1 1/2 teaspoons baking powder
1/4 teaspoon baking soda
3/4 teaspoon salt
1/4 cup unsalted butter, melted
1/4 cup vegetable oil
3/4 cup + 2 tablespoons granulated sugar
1 vanilla bean pod, scraped
2 large eggs
2 tsp vanilla extract
1 cup milk
1/4 to 1/2 cup mini chocolate chips (depending on how chocolate-y you want them)

Preheat oven to 425 degrees and prepare donut tin. Set aside.

In a large bowl mix together flour, baking powered and soda, and salt. Set aside.

In the bowl of a stand mixer, blend butter, oil, sugar, and vanilla bean on low until combined. Add in eggs one at a time, then blend in vanilla extract.

Add half the flour mixture to the wet ingredients and mix on medium speed until combine. Once combined, slowly pour in half the milk. Add remaining flour mixture once milk has been incorporated. Slowly pour in the rest of the milk, and mix on medium speed until everything is combined.

Take bowl of stand mixer out, and gently mix in chocolate chips with a spatula.

Spoon dough into a large pastry bag, snip the end off, and fill donut pan with dough.

Bake for 7-8 minutes or until the donuts spring back when touched. Immediately remove from pan and let cool on a wire rack.

While donuts cool make the berry coulis.

1 cup frozen mixed berries, thawed
3 tablespoons sugar
juice 1/2 lemon
1-2 tablespoons water 
1 1/2 cups powdered sugar

In a small saucepan over medium-low heat cook berries, sugar, and lemon juice until thick and bubbly. Remove from heat and stir in water.

Press berry mixture through a fine mesh sieve into a large mixing bowl. Add powdered sugar to the mixture to form a glaze. 

Dip cooled donuts into berry glaze and place back on a wire cooling rack to completely set.


Wednesday, February 12, 2014

chai-spiced donuts with browned butter glaze

The following photos are what i WISH my mornings looked like.


Bright sunlight, fresh flowers, a donut on my plate and a pot of tea steeping beside a cute milk bottle filled with fresh cream. Ah. That would be the life! Instead, mornings around my house include eating breakfast on the floor of my bedroom while I put my makeup on in front of my full length mirror while watching beauty videos on youtube. Was that a run on sentence? Hmmm. 


Anyway! Let's talk more donuts ok? Theeese little babies are super full of chai flavor and finished with the best thing ever - browned butter glaze. Have you ever tried browned butter? If the answer is no, what are you waiting on?!?!? It can be made in the microwave for goodness sake! If the answer is yes, you've probably already run into your kitchen to start making these. You already know you don't waste a second when someone gives you an excuse to use the nutty, buttery goodness. Smart people!


Here's to wishing that all your mornings as cozy, bright, and flavorful as these pictures! Stay tuned for one more donut recipe later this week!

Chai-Spiced Donuts with Browned Butter Glaze

inspired by Food Mouth

1 cup flour
1/4 cup sugar
1 teaspoon baking powder
1 teaspoon cinnamon
1/4 teaspoon nutmeg
1/4 teaspoon cardamom
1 tablespoon vanilla extract
1/2 cup milk
1 chai tea bag
1 egg
1/2 stick butter
1 1/2 cups powdered sugar
1-2 tablespoons milk
salt, to taste

For the Donuts
In a small saucepan heat milk over low heat until steaming. Immerse tea bag in heated milk and let cool. Remove tea bag.

Preheat oven to 325 degrees, and grease donut pan. Set aside.

In a large bowl combine flour, sugar, baking powder, and spices. 

In a separate bowl, whisk together cooled milk, egg, and vanilla extract.

Pour wet ingredients into the dry and mix until just combined. 

Spread batter into prepared donut pan and bake for 7-9 minutes or until the donuts spring back when touched.

Remove immediately from pan and cool donuts on a wire rack.

For the Browned Butter Glaze
In a medium size bowl, combine powdered sugar and salt. Set aside.

In heat proof cereal-sized bowl, microwave butter on high for 1 minute. Remove from microwave and stir. Keep microwaving for 1 minute increments until brown flecks appear on the bottom of the bowl.

Pour browned butter into the bowl with the powdered sugar and whisk. Depending on the texture of the glaze at this point, you can either add a tablespoon of milk to thin the glaze, or add more powdered sugar to thicken it up. I chose to keep my glaze very loose and added a full 2 tablespoons of milk.

To Assemble the Donuts
Once the donuts are cool and the glaze has been prepared, dip donuts into glaze one-by-one and set on a cooling rack over a sheet pan to catch any drippy glaze. Since my glaze was very thin, I dipped my donuts 3 times..if your glaze is thick you may only have to dip once or twice. It's really up to you!

Serve and eat these donuts immediately. 


Monday, February 10, 2014

s'mores donuts


S'mores are so summertime, and I think we can all use a little summer right about now! Raise your hand it your tired of cleaning your car off every morning and driving with a fear of black ice in the back of your mind…psssst I'm raising my hand!


Let's all be in denial together about what season we're in, ok? Let's think about sitting on the dock at the lake in cut-off shorts with our toes in the water watching the sun set. Or, hiking our favorite trail. You know the one - it's so peaceful and skirts the lake. How about late night campfires! Roasting a homemade marshmallow over an open fire so it's a little charred and stuffing it between chocolate and graham cracker. Is there anything more delicious? 

I know something that's more delicious….these DONUTS! They are sooo soft and spiced with just the right amount of cinnamon. Fry the dough up, stuff it with the most fluffy marshmallow creme, and top it with chocolate ganache and graham crumbs. So perfect. Make these!

S'more Donuts

Dough inspired by Joy the Baker
Marshmallow Creme inspired by How Sweet it Is 

Pillow-soft dough gets fried to perfection, stuffed with a puffy cloud of the most perfect marshmallow creme, and finished chocolate ganache and salted graham cracker crumb. Who needs summer when you have these donuts?

Makes 10 - 12 donuts

For the Donuts
1 (1/4 ounce) packet active dry yeast
2 tablespoons warm water
3 cups all purpose flour
1 cup milk at room temperature
1/4 cup unsalted butter, softened
3 large egg yolks
2 tablespoons granulated sugar
1 1/2 teaspoons salt
1/2 teaspoon cinnamon

For the Marshmallow Creme
4 large egg whites
1 cup granulated sugar
1/4 teaspoon cream of tartar
1 teaspoon vanilla extract

For the Ganache
1/2 cup dark chocolate chips
1 teaspoon coconut oil

For the Salted Graham Topping
3 whole graham crackers
1 teaspoon salt

Stir together the yeast and warm water in the bowl of a stand mixer fitted with the paddle attachment. Allow to bloom for at least 5 minutes or until the yeast is foamy.

Add milk, softened butter, egg yolks, sugar, salt, and cinnamon to the yeast. Mix on medium speed until just incorporated. Remove paddle attachment and switch to the dough hook.

Add four 1 cup at a time until the dough comes together and is soft and sticky. Remove dough from the mixer and place in a large well-oiled bowl. Cover with a kitchen towel and let the dough rise for 1 1/2 - 2 hours, or until doubled in size. 

Once the dough has risen, turn it out onto the counter and knead a little until you have a smooth ball of dough. With a rolling pin, roll dough out into a 12-inch round circle. Using a 3-inch cutter, cut dough and place on a parchment lined cooling rack to raise for another 30 minutes until puffed.

In a large pot, empty a large container of canola oil and heat to 350 degrees. Once the oil is ready, gently place 2 donut rounds into the oil and fry until golden. Flip and repeat on the opposite side. Immediately remove from the oil onto a paper towel-lined cooling rack. 

Allow oil to come up to temperature again and repeat with the remainder of the donuts, two at a time.

While donuts cool, prepare the marshmallow creme filling.

For the Filling
In the bowl of your stand mixer, combine egg whites, sugar, and cream of tartar. Place the bowl onto a pot of simmering water to create a double-boiler. Whisk the egg mixture continuously over the heat until the sugar has dissolved and the egg whites are warmed through. Immediately remove the bowl and attach it to your stand mixer. Mix on high speed until the mixture is thick and shiny, about 6-7 minutes. Add in the vanilla extract and beat for another minute to ensure it's incorporated. Place marshmallow creme into a pastry bag fitted with a large tip.

For the Chocolate Ganache
In a heat proof bowl, microwave chocolate chips and oil for about 1 minute. Remove from microwave and stir until the chips have melted and the chocolate is shiny and smooth.

For the Graham Topping
Break graham crackers into pieces and place them in a food processor. Pulse until the crackers are fine crumbs. Stir in salt to combine. Pour into a medium size bowl.

To Assemble Donuts
poke a hole in the side  of the donut using the handle of a wooden spoon. Insert the tip of the marshmallow creme filled pastry bag, and pipe in filling. The filling with push the tip out of the donut when it's properly filled.

Next, dip creme filled donut into warm chocolate ganache and place on a cooling rack over a large baking sheet. Finish filling and dipping the remainder of the donuts to allow the chocolate ganache to set.

After the ganache has set a little, dip donuts into salted graham topping and return to baking sheet to set.

These donuts should be served within a day of preparing. Store in an airtight container. Enjoy!


Sunday, February 9, 2014

donut week!

via
Brace yourselves, dig out your stretchy pants, and get ready….donuts are coming to this blog this week. 

You're welcome!

Friday, February 7, 2014

black bottom lemon custard pie.


They rode together on their way to the church. He drove with her right by his side.The day was warm, but crisp with bright leaves falling onto the wet pavement of the back rode they were traveling. She in a jean jacket, he in his favorite white button up and flip flops. His guitar was in the back seat, and he reached over to gently hold her hand in his. 


They talked about the future. He wanted a little boy named Levi and she dreamed about taking care of their kids backstage while he played the music he wrote. Life was perfect and happy and the future seemed bright and full of goodness. She still remembers the curve of the road, the way the wind felt in her hair, and the conversation in it's entirety. 


They pulled up to the front of the tiny church along with the rest of the group and got out of the car. He had his guitar in his right hand and reached out with his left to grab her hand. Holding his hand like this made her proud and gave her a glimpse into the future she was so certain of. They walked up to the church and he introduced himself to the pastor then turned to her and said, "and this? this is my girl". She still remembers the flush on her cheeks in that moment. A result of pure joy…she hasn't felt that way in years.


They went inside to get set up. She was almost giddy glancing at him every once in a while. His gaze was always on her. Once the service started she stood in the front row watching him as he picked up his guitar and slung it over his shoulder - a movement she'd seen hundreds of times. It was the most natural thing in the world. He sang into his mic leading the congregation in worship. She stood on the front row worshipping with him and was suddenly overtaken with happiness. This was her dream. Supporting him. Being the face he always saw on the front row. She was certain this was were she was meant to be. She still remembers the way you looked at her from the stage that day. 


They talked all the way home. He pulled his car over to the side of the road a few miles away from her parent's house where he would drop her off. He pulled her in close, kissed her on the forehead, and told her he hoped all the rest of their days together would be this perfect. He told her that day contained all the things he dreamed about. He kissed her softly, grabbed both of her hands, and asked her to be his wife. She still remembers what it felt like to say yes and mean it with all of her heart. 


Black Bottom Citrus Custard Pie


Buttery crust + a layer of bittersweet ganache + sweet citrus custard.

1 prepared pie crust
3/4 cup heavy cream
4 oz bittersweet chocolate, chopped
4 large eggs + 1 egg yolk
1 1/3 cups granulated sugar
1/2 teaspoon salt
1/2 cup freshly squeezed Meyer lemon juice (I used 3 lemons)
1/4 cup freshly squeezed orange juice (I used half an orange)
zest of one Meyer lemon
zest of 1/4 orange

Press pie crust into 9 inch pie pan. Set aside. Preheat oven to 325 degrees. 

In a large heat-proof measuring cup, heat 1/4 cup of heavy cream for 2 minutes. Pour chopped chocolate into heated cream and whisk to combine. 

Pour ganache into pie crust and spread evenly over the bottom. Chill pie crust in the fridge while you prepare the citrus custard.

In the bowl of a stand mixer, combine eggs and egg yolk, sugar, and salt on medium speed until thick and well combined. 

Turn mixer on low speed and pour in citrus juices, zest, and remaining heavy cream. Blend well. Strain custard with a fine mesh sieve into a medium size bowl.

Place the ganache-lined pie shell on a rimmed baking sheet, and pour strained filling into the crust. 

Bake pie on the middle rack for 30 minutes. The pie is finished when the edges are set but the middle is no longer liquid but still wobbly. 

Allow to cool completely on a wire rack for 2 to 3 hours. Pie can be served slightly warmed, room temperature, or cool (my favorite way). Store pie in the fridge for 2 days or at room temperature for 1 day.


Thursday, February 6, 2014

Waterlogue

GUYS! I found the coolest app EVER. It's called waterlogue and it takes photos you've taken and turns them into gorgeous watercolor-looking works of art. I'm freaking obsessed. Look how pretty!


This is the original photo:


This is the photo processed through Waterlogue - AHHHH!


I mean really!?! How gorgeous! Now I just need to get one of these printed to hang in my kitchen! YAY! 

Follow me on Instagram @shutterbake - I'd love to be invisible internet friends with you! :)

Wednesday, February 5, 2014

easy, pretty jar DIY


A few weeks ago I shared a recipe for caramel apple pie floats and ended up with three empty glass jars. I couldn't stand the thought of throwing the jars out since I really loved the shape, so I decided to DIY them! I LOVE how they turned out, and they were so simple! Go make a float for someone you like, and then make these cute jars!


Start with three empty jars - I used the empty Martinelli's Cider jars that I bought from Target. Rinse the bottles out to make sure there isn't any cider left in them, and scrape the labels off with a butter knife while they're still wet. Turn them upside down to dry completely overnight.

Once the jars are clean and dry, empty any color of acrylic paint into the jars and pat the sides to make sure every inch of the jars are covered in paint. I decided to paint the inside of the jars to maintain the glossiness, but you could choose to paint the outside if you want! It's totally up to you! Make sure you use enough paint to coat the inside, but not too much. I used too much paint on the pink jar, and two large globs of paint dripped off the sides - thank goodness for the burlap!

Once all three jars have been painted, turn them upside down on a paper towel again to dry overnight. After the paint has dried move on to decorating with twine and burlap!


For the twine jars, start with a dot of hot glue on the mouth of the jar, and wrap the twine around a few times. Place another dot of hot glue a few inches down, and wrap again. More glue, more wrapping…you get the idea! To finish, dot a small amount of hot glue between to pieces of twine and secure the last bit of twine to the jar so it hides the end. 

For the burlap jar, cut a small amount of burlap from the roll. Fold the burlap in half and hot glue the edges together. Make a vertical line of hot glue on the jar and secure the end of the burlap to the hot glue. Wrap remaining burlap ribbon around the jar, and secure with another line of hot glue. Trim any excess, and you're done!


Originally I sat these jars in the corner of my bedroom, but now I've moved them above the cabinets in my kitchen and I love it! Once I find something taller to put in them, I think I'll move them back. Anyone have any ideas?

Glass jars - empty Martinelli's cider jars I bought at Target. 

Paint - Martha Stewart Crafts Multi-Surface Satin Acrylic Paint in Couscous Couscous, Poodle Skirt, and Wet Cement from AC Moore. 

Twine - I bought mine a billion years ago and I can't remember where it's from, but here's something similar. 

Chevron burlap - Mine was from Hobby Lobby 50% off (WOO HOO!). I couldn't find it on their site, but here is something similar. 

Monday, February 3, 2014

cinnamon sugar kettle corn with spiced chocolate drizzle


A few weeks ago I bought a few bags of this popcorn and fell madly in love. I really wanted to recreate it at home, but I woke up one night with an ingenious idea - a spiced chocolate drizzle. I absolutely LOVE the flavor of chocolate with the heat of cinnamon and cayenne pepper mixed in. You get a nice extra hint of sweetness from the cinnamon, and a nice kick from the cayenne. 


Making and personalizing your own popcorn at home is so simple, and you can make it as healthy or as decadent as you want. I used a mixture of coconut oil and butter for this recipe, but you could easily use all coconut oil to make it a little less naughty. I also used dark chocolate for the drizzle so this is practically a health food! 


Cinnamon Sugar Kettle Corn with Spiced Chocolate Drizzle

2 tablespoons coconut oil
2 tablespoons unsalted butter
1/2 cup popcorn kernels
3 tablespoons granulated sugar
1/2 tablespoon ground cinnamon
1 teaspoon salt

In a large saucepan with a tight fitting lid, melt the coconut oil over medium heat. After the coconut oil has melted, increase the heat to medium-high and melt the butter.

Meanwhile, in a small bowl combine the sugar and cinnamon. Set aside.

Once the butter and oil have melted, add the popcorn kernels and sprinkle with the cinnamon sugar mixture as evenly as possible and cover with the lid.

Once the kernels begin to pop, remove the pan from the heat and gently shake so the sugar doesn't burn.

Move pan back to the heat and shake continuously until the kernels begin to pop.

Once the popping begins to slow down, turn the heat off, and crack the lid to release the steam. 

Once the popping stops, remove the lid and sprinkle with salt.

Immediately pour onto a baking sheet lined with parchment paper. Be careful not to touch the popcorn since the sugar sill be really hot.

For the Drizzle
1/2 cup dark chocolate chips
1/4 teaspoon ground cinnamon
1/4 teaspoon cayenne pepper

While the kettle corn cools, melt the chocolate chips in the microwave. Add the ground cinnamon and cayenne pepper to the melted chocolate and stir to combine.

With a spoon, drizzle the melted chocolate over the cooled popcorn. 

Let the chocolate set for several minutes before enjoying. 

Popcorn will keep in an airtight container for 2 days.


PS - spicy and sweet make a good valentine treat.